技术要点
运行时调整控件大小和位置很简单,在.Net下只需修改控件的location和size属性即可,动态调整时再捕获MouseDown、MouseMove及MouseUp事件来实时修改上述两个属性就可以实现。但是我们会发现在Visual Studio.Net的开发环境中设计窗体布局时,选择了控件后总会有一个可以调整其大小和位置的边框出现以方便用户进行操作。在VC6中MFC曾经为我们提供了CRectTracker类来完成这项工作,但是C#里我却没有发现相关类。运行时可以调整控件位置和大小在某些情况下非常有用,譬如.Net提供了窗体打印功能,若能够在运行时调整控件大小和位置我们将会动态的生成非常漂亮和规整的报表来。借鉴CRectTracker类我们发现它实际上就相当于一个父控件,然后传递给它不同类的指针进行附着。在C#下我们以另外一种思维来考虑这个问题,当在设计时的窗体上放置一个Panel控件,然后再往该Panel控件上放置一个子控件并填充之,那么在设计时调整Panel大小和位置时其子控件都会随之改变,我们就利用这个原理在运行时捕获获得焦点的子控件,然后让其成为类似于前述Panel父控件的子控件,并且在父控件周围利用.Net GDI+画上用于调整的边框和锚点,当鼠标在特定位置按下并拖动时激活MouseMove事件进行响应。实现的关键就是针对于类似Panel控件的操作,直接使用Panel控件进行上述操作也未尝不可,但是我们将会创建一个专门用于运行时动态调整控件大小和位置的自定义控件,我们把它命名为:CRectControl。
程序实现
启动Visual Studio .Net 2005,首先创建C#类库。要想创建一个可以包容其它控件的容器控件,那么控件基类必须从System.Windows.Forms.UserControl继承,代码如下:
public class CRectControl : System.Windows.Forms.UserControl新建类库时默认引用不包括System.Windows.Forms和System.Drawing,我们必须手动将上述程序集添加到项目引用中。System.Windows.Forms为我们提供了丰富的创建界面的功能和方法,System.Drawing提供了对 GDI+ 基本图形功能的访问,我们还需要导入System.Drawing.Drawing2D,该命名空间提供高级的二维和矢量图形功能,代码如下:
using System;
using System.Drawing;
using System.Windows.Forms;
using System.Drawing.Drawing2D;
CRectControl创建时传递需要调整的控件实例,根据控件大小及位置手动绘制CRectControl的边框,包括8个用于调整大小的锚点都是需要手动绘制的,代码如下:
public Rectangle Rect
{
    get { return baseRect; }
    set
    {
        int X = Square.Width;
        int Y = Square.Height;
        int Height = value.Height;
        int Width = value.Width;
        baseRect = new Rectangle(X, Y, Width, Height);
        SetRectangles();
    }
}
void SetRectangles()
{
//定义8个小正方形的范围
//左上
SmallRect[0] = new Rectangle(new Point(baseRect.X - Square.Width, baseRect.Y - Square.Height), Square);
//上中间
SmallRect[4] = new Rectangle(new Point(baseRect.X + (baseRect.Width / 2) - (Square.Width / 2), baseRect.Y - Square.Height), Square);
//右上
SmallRect[1] = new Rectangle(new Point(baseRect.X + baseRect.Width, baseRect.Y - Square.Height), Square);
//左下
SmallRect[2] = new Rectangle(new Point(baseRect.X - Square.Width, baseRect.Y + baseRect.Height), Square);
//下中间
SmallRect[5] = new Rectangle(new Point(baseRect.X + (baseRect.Width / 2) - (Square.Width / 2), baseRect.Y + baseRect.Height), Square);
//右下
SmallRect[3] = new Rectangle(new Point(baseRect.X + baseRect.Width, baseRect.Y + baseRect.Height), Square);
//左中间
SmallRect[6] = new Rectangle(new Point(baseRect.X - Square.Width, baseRect.Y + (baseRect.Height / 2) - (Square.Height / 2)), Square);
//右中间
SmallRect[7] = new Rectangle(new Point(baseRect.X + baseRect.Width, baseRect.Y + (baseRect.Height / 2) - (Square.Height / 2)), Square);
//整个包括周围边框的范围
ControlRect = new Rectangle(new Point(0, 0), this.Bounds.Size);
}public CRectControl(Control theControl)
{
InitializeComponent();
currentControl = theControl;
Create();
}private void Create()
{
//创建边界
int X = currentControl.Bounds.X - Square.Width;
int Y = currentControl.Bounds.Y - Square.Height;
int Height = currentControl.Bounds.Height + (Square.Height * 2);
int Width = currentControl.Bounds.Width + (Square.Width * 2);
this.Bounds = new Rectangle(X, Y, Width + 1, Height + 1);
this.BringToFront();
Rect = currentControl.Bounds;
//设置可视区域
this.Region = new Region(BuildFrame());
g = this.CreateGraphics();
}private GraphicsPath BuildFrame()
{
GraphicsPath path = new GraphicsPath();
BoundRect[0] = new Rectangle(0, 0, currentControl.Width + (Square.Width * 2) + 1, Square.Height + 1);
BoundRect[1] = new Rectangle(0, Square.Height + 1, Square.Width + 1, currentControl.Bounds.Height + Square.Height + 1);
BoundRect[2] = new Rectangle(Square.Width + 1, currentControl.Bounds.Height + Square.Height-1, currentControl.Width + Square.Width + 2, Square.Height + 2);
BoundRect[3] = new Rectangle(currentControl.Width + Square.Width-1, Square.Height + 1, Square.Width + 2, currentControl.Height - 1);
path.AddRectangle(BoundRect[0]);
path.AddRectangle(BoundRect[1]);
path.AddRectangle(BoundRect[2]);
path.AddRectangle(BoundRect[3]);
return path;
} 边框和锚点的大小位置计算完毕后,我们开始实际的绘制操作:
public void Draw()
{
    try
    {
        g.FillRectangles(Brushes.LightGray, BoundRect); //填充用于调整的边框的内部
        g.FillRectangles(Brushes.White, SmallRect); //填充8个锚点的内部
        g.DrawRectangles(Pens.Black, SmallRect); //绘制8个锚点的黑色边线
    }
    catch (Exception ex)
    {
        Console.WriteLine(ex.Message);
    }
}
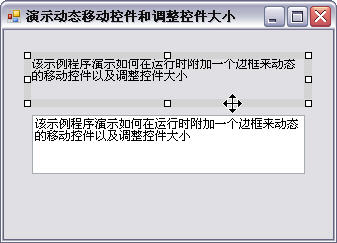
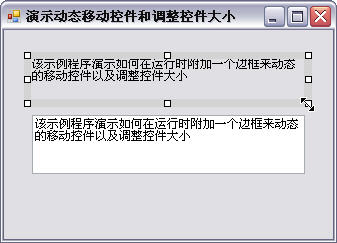
界面绘制完毕后,我们需要对用户移动和调整边框事件发生时作出响应。当鼠标移动到边框时鼠标指针首先应该设置成十字形的可以拖动的鼠标指针样式,当鼠标移动到8个锚点时鼠标指针应该设置成可以调整大小的鼠标指针样式,下图是程序运行时鼠标指针的样子:


为了实时更新鼠标指针的样式,我们需要在CRectControl中捕获Mouse_Move事件,在Mouse_Move事件中我们进一步检测是否有鼠标左键按下,若没有鼠标按下我们只需更新鼠标指针的样式即可,若同时有鼠标按下我们还必须根据鼠标拖动的位置相应调整被控控件的位置和大小,为此我们新建个枚举类型的变量来保存当前鼠标停留的位置信息:
enum HitDownSquare
{
    HDS_NONE = 0,
    HDS_TOP = 1,
    HDS_RIGHT = 2,
    HDS_BOTTOM = 3,
    HDS_LEFT = 4,
    HDS_TOPLEFT = 5,
    HDS_TOPRIGHT = 6,
    HDS_BOTTOMLEFT = 7,
    HDS_BOTTOMRIGHT = 8
}
private HitDownSquare CurrHitPlace;
private void RectTracker_MouseMove(object sender, System.Windows.Forms.MouseEventArgs e)
{
if (e.Button == MouseButtons.Left)
{
if (isFirst == true)
{
prevLeftClick = new Point(e.X, e.Y);
isFirst = false;
}
else
{
this.Visible = false;
Mouse_Move(this, e); //调整位置或大小
prevLeftClick = new Point(e.X, e.Y);
}
}
else
{
isFirst = true;
this.Visible = true;
Hit_Test(e.X, e.Y); //更新鼠标指针样式
}
}鼠标拖动结束释放按键后我们需要根据被控控件新的位置或大小重新绘制CRectControl并显示出来:
private void RectTracker_MouseUp(object sender, System.Windows.Forms.MouseEventArgs e)
{
    Create();
    this.Visible = true;
}
Mouse_Move(this, e)和Hit_Test(e.X, e.Y)两个方法具体的实现请参见附带源码,不在这里占用篇幅。
